Tuesday, December 12, 2006

Snowmen Ornaments


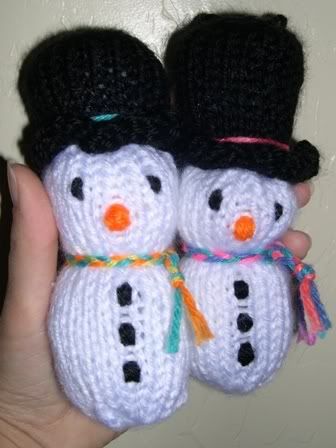
I have been knitting quite a few things lately, but as most of them are gifts I am reluctant to post them until they've been given!  I can post a picture of these snowmen ornaments I've been working on.  I'm making them for the kids of my friends.  So far these two are the only ones I've finished.  I hope to make a total of at least seven - now that I've gotten the pattern down, I'm going to knit all the pieces first and then assemble them all at once.  I got the pattern from Knit List here: Snowman Ornament Pattern.  One change I made to the pattern was to not knit the colored stripe on the hat - instead I knitted the whole thing in black and then tied a piece of yarn around the base.  I also knitted the ornament with size 10 needles, making it larger than it would have been with size 7.

I'll be knitting like crazy this week so I can finish all my gifts soon!

Sunday, December 03, 2006

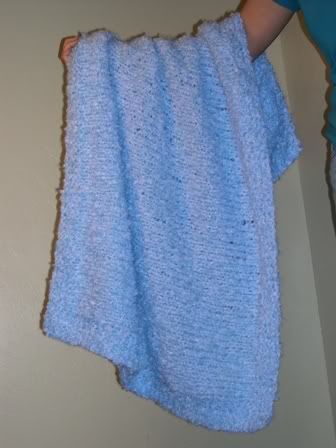
Baby Blanket


Wow!  This blanket was definitely the most time-consuming project so far.  It took me over a week to finish.  The pattern I used was called Easiest Baby Blanket from Ruhamas.com.  Originally I planned to knit it with size 15 needles and by holding two strands of yellow sport weight yarn together throughout.  However, I knitted a few rows with that yarn and I did not like the big holes it created (though later on vacation I saw a very nice baby blanket knitted with large needles and light yarn - in the finished product the holes didn't look strange).  So I went back to the store and purchased Red Heart Baby Clouds super bulky yarn in Blue Sky.  The bulk of this yarn makes the holes much smaller when knitted.

Unfortunately, I did not follow the directions very well.  For some reason I decided that casting on 75 stitches was not enough, so I cast on 90 instead.  This made the blanket very very wide - about 49 inches.  I then knit 102 rows, which made it 34 inches long.  I had been hoping for a finished blanket that was square, but by the time I got near the end of my third ball of yarn I could see that if I did make it square it would be gigantic so I stopped.

The hardest part of this blanket was alternating knitted rows with purled rows.  It seems to take me twice as long to purl a row than to knit one.  I probably could have finished it a lot faster if I had just knit the whole thing.

It may not be the prettiest blanket ever, but hopefully my friend (and her baby!) will like it.

Tuesday, November 28, 2006

Thanksgiving in Cloudcroft

Our Thanksgiving trip to Cloudcroft, New Mexico was great.  The only thing missing was the snow (though we did get a tiny bit of sleet one night).  The cabins we stayed in (Spruce Cabins) were cute and eclectically decorated.  For the most part we enjoyed them, but we did discover a few little annoyances.  The issues were mainly with the cabin my parents were staying in - the fireplace didn't draw well so they were constantly having to open doors and windows to get rid of the smoke.  Also, their heater would wake them up all night long by making a loud metallic clang whenever it came on.  The cabin managers had helpfully put a sign next to the heater telling guests not to worry about the loud noise - the heater was not broken.  Maybe it would have been better to actually get rid of the noise than to just acknowledge it with a sign.

I was able to try out my hat, gloves and scarf while on vacation.  They were all very nice, though the hat did not block as much air as I would have liked.  If I make another hat I'll probably use smaller needles to make the holes in it smaller.  My dad liked his scarf too.  I was able to find a small yarn shop in Cloudcroft and the lady working there helped me pick out some yarn for a scarf.

Unfortunately I didn't have as much time to work on the baby blanket as I thought I would.  I made it a little wider than it probably needed to be (52 inches) and I only have 13 inches knitted lengthwise.  It's also taking me longer since I'm having to alternate between knit and purl rows of stitches.  Hopefully I can finish it before my friend has her baby - she's scheduled for a c-section in about two weeks!

Tuesday, November 21, 2006

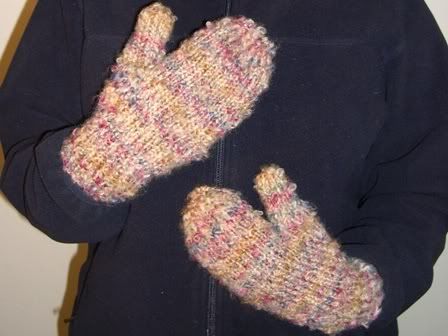
My Mittens are Finished!

Yay!  I finally managed to finish my mittens.  Here they are:


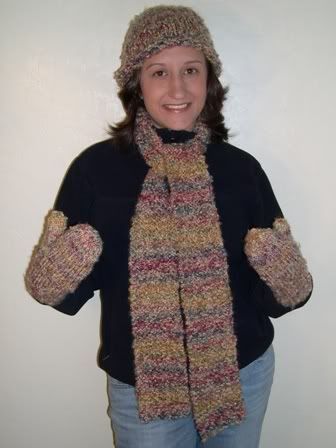
And here is my entire matching set:


Mittens are so complicated (at least for me)!  Since I almost never need mittens I doubt I'll be knitting more any time soon.  The instructions I used were from HJS Studio's website - they call it their Generic Mitten Pattern (scroll down 1/3 of the page to see it).    This is another pattern like the hat where you use your measurements and your gauge (stiches per inch) to knit - they do not tell you exactly how many stitches and rows to knit.  I like this type of instruction because it makes it easier to use whichever type of yarn and size needles I want. 

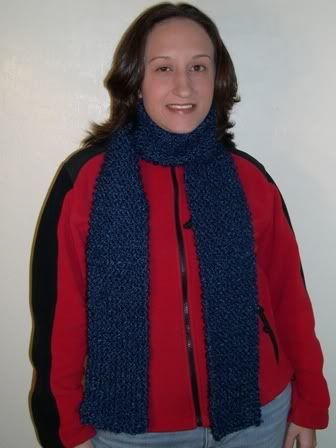
While I was knitting the mittens I also knitted a simple scarf for my father:


This scarf was knitted following the same Loopy Garter Stitch pattern used with my previous scarf.  Since it is for my dad, I knitted 12 stitches per row instead of 10 to make it wider and made it 6 feet long instead of five.  I also used a different style of yarn (Lion Brand Homespun in Colonial).  This yarn was less bulky than the Red Heart Light and Lofty yarn I used with the first scarf.  I started out knitting with only one strand of the Homespun yarn but I found that with the size 15 needles I was using this was going to leave big holes in the scarf.  I ended up getting another ball of the same yarn and knitting with two strands of yarn held together throughout.

I'm now working on a baby blanket for a friend who is expecting.  It will probably take me all of Thanksgiving vacation to finish.  Next I'm thinking of making some kind of knitting bag - I'm getting tired of chasing yarn, needles, and other knitting bits around the house.

Friday, November 17, 2006

Craft of the Week: Knitting

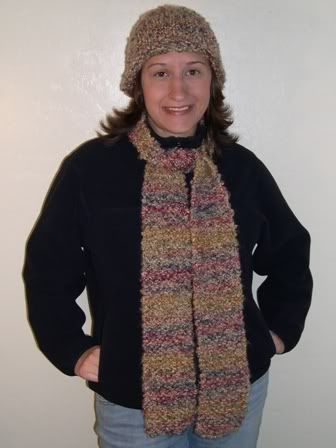
Here's a photo of the scarf and hat I knitted this week:


These are the first things I have ever knitted - it's definitely not as hard as I thought it would be!

When I said Craft of the Week it's kind of tongue-in-cheek.  When I usually start some craft project it's not with the idea that I'll only do it for a week.  Generally what I'm thinking is "Wow, this is so much fun I'm going to do it every day for the rest of my life!"  However, that enthusiasm usually dies after I work on the project obsessively for a few days and burn out on it.  Then I don't pick the project up again until months later (at which time I get burned out on it all over again).

Anyhow...while searching for something to do last Thursday I somehow hit on the idea of learning to knit.  I went to the store and bought a "learn to knit" kit and a cheap ball of yarn.  After a bit of trouble getting started (I had problems figuring out how to "cast on," which is just attaching the yarn to the needle) I eventually figured out how to do the two basic stitches (the knit and purl stitches).  I then tried doing a few fancy stitches but got annoyed quickly.  It took me over two hours to do a 1 inch by 2 inch sample of a cable stitch (the one you see on sweaters all the time).  It took so long because I had to count each stitch I did and had to constantly switch back and forth between knit and purl stitches.

At this point I wanted to actually try making something, but all the items listed in my how-to book required counting and fancy stitches.  So I went on the internet and started to look for instructions for a scarf that could be done just by making the same stitch over and over (without counting!).  Here's a link to the instructions that I ended up using:  The Blue Blog Scarf Patterns.   The pattern I used was the loopy garter stitch skinny scarf.  Note that "garter stitch" is just a fancy name for using the regular knit stitch over and over.  These instructions are very short, but they do the job.   I used very bulky yarn (Red Heart Light and Lofty in Cape Cod Multi) and size 13 needles.   Since my yarn was so bulky and my needles so big I only made the scarf 10 stitches wide.  It ended up being just over 5 feet long (I used almost all the ball of yarn).  I originally wanted to add fringe to the ends, but I left it off since it didn't look right when I started to put it on.  Using large needles and bulky yarn is great if you are a beginner, because it makes any mistakes less noticable.  I dropped several stitches and didn't do a very good job of repairing them but the mistakes aren't noticable at all.  The scarf took about a day and a half for me to make.

So, after finishing the scarf I decided I wanted a matching hat (since I live in the southwest making hats and scarves is a little pointless, but what the heck, it's fun).  So I found a hat pattern online that again called for doing the same stitch over and over again: Crazy Aunt Purl's Roll-Brim Hat.  "Aunt Purl" writes very funny instructions which were really easy to understand.  Only difference between my scarf and this hat is that, since the hat is a circular object, I had to buy a circular needle (two needles connected by a cable) to knit it.  Of course I bought the circular needle (size 13) before reading the pattern thoroughly, so I later discovered that I would also need four double-pointed needles of the same size as the circular needle to finish the project (double pointed needles work better than circular needles when the knitting gets really small, like at the peak of the hat).  And my local store only carries double-pointed needles in size 3 - much smaller than the size 13 I was using!  I didn't want to do the whole thing in size 3 - the smaller the needle, the longer it takes to knit something (at least for me!).

So to finish the hat I ended up buying a dowel rod about the same size as the size 13 needles.  I cut it into four pieces and sharpened the ends of each piece to a point using an oversized pencil sharpener.  They weren't the greatest replacements (splinters on the ends kept catching the yarn) but they functioned adequately.  Other than having the right sized needles, my only other piece of advice when making this hat is to knit at least 7 inches before starting the decreases (a knitting term Aunt Purl explains).  I only knitted about 6 and 1/4 inches and it feels like the hat is a tiny bit too short.  The hat took less time to make than the scarf - I finished it in under a day.

So, having finished the hat and scarf I am now working on a pair of matching mittens.  They're giving me a bit of trouble!  Since the mittens are smaller in diameter than the hat the circular needle won't work.  And since my "dowel needles" are difficult to use I didn't want to have to struggle with them through two whole mittens.  So I ended up using the size 3 double-pointed needles from the store.  This means the mittens are taking forever, and having to work with such small needles is giving me awful hand cramps.  I've been struggling with one mitten for three days now and it has just gotten to the point where it looks like a fingerless glove.   Since we're going to the mountains for Thanksgiving I hope to finish the mittens before then so I can actually get some use out of them!

Thursday, November 16, 2006

Tilapia Recipes

Here's a link to a great tilapia recipe from Allrecipes.com that Kevin and I tried the other night: Broiled Tilapia Parmesan. Basically you top the tilapia with a parmesan cheese mixture and cook it until the topping is browned. Be sure to make plenty of the topping so the fish is well covered.

Kevin and I have another favorite tilapia recipe that we picked up from a couple of our geology classmates. It's an incredibly simple recipe that I've imaginatively dubbed "Jennifer and Ryan's Geology-Style Tilapia."

Jennifer and Ryan's Geology-Style Tilapia
Ingredients:
Talapia (whitefish) fillets
Kraft Sun-Dried Tomato Dressing
Aluminum foil

Directions:
-Preheat oven to 350 degrees F.
-Place one fillet on aluminum foil.
-Cover fillet in dressing.
-Fold foil into packet around fish.
-Repeat for each fillet.
-Place all fillet packets onto a baking sheet and put in oven.
-Bake fish for approximately 20 minutes (until it flakes with a fork).

Notes: You can replace the Kraft Sun-Dried Tomato Dressing with another vinegarette-type dressing if you wish. This recipe can also be cooked on a grill (that's actually how Jennifer and Ryan made it).

One more thing about tilapia - according to Wikipedia, they're actually a type of cichlid (a generally freshwater African fish). I wonder if Kevin has realized yet that they're cichlids (he use to have some cichlids as pets).

Tuesday, November 14, 2006

Chocolate Chip Cookie Recipe


Yes, this is an ACTUAL picture of the ACTUAL cookies that I ACTUALLY baked this morning! It's my favorite cookie recipe. I like it because it uses vegetable oil instead of butter. When I was first learning to bake in high school I hated trying to make cookies with butter because it had to be softened. Somehow I'd always mess it up and melt the butter and my cookies would end up looking like burned roadkill (very flat!). My mom got this recipe from a teacher she worked with and it has yet to fail me.

Apple Annie's Chocolate Chip Cookies (I have no idea who Apple Annie is)

Ingredients:
1 1/2 cups sugar
1 1/2 cups brown sugar, packed
1 1/2 cups vegetable oil
2 tablespoons vanilla
3 eggs
4 cups flour
1 1/2 teaspoons baking soda
1 1/2 teaspoons salt
12 oz. (one bag) chocolate chips
1 cup chopped pecans (optional - I never use them)

Directions:
-Preheat oven to 375 degrees F.
-Mix sugar, brown sugar, vegetable oil, vanilla and eggs together until well blended.
-Add remaining ingredients and blend thoroughly (Cathy's note: don't be surprised if the dough doesn't look like normal cookie dough - it's not supposed to. It will be much thicker, more oily and consequently less sticky than normal dough.).
-Drop by rounded teaspoonfuls 2 inches apart on to an ungreased cookie sheet.
-Bake 8 to 10 minutes or until lightly browned (Cathy's note: It took me over 15 minutes to get them lightly browned the last time I made them. My advice is to check them at 8 minutes and then every 2 or so minutes after until they are lightly browned).
-Cool before removing from cookie sheet.

Jack Sparrow Pumpkin

I wanted to show off my Halloween pumpkin a little more, since we only had four trick-or-treaters! Here's my photo pumpkin of Captain Jack Sparrow:


I designed it myself from a photo of Cap'n Jack I found online. It's fairly easy to carve a pumpkin from a photo, but it takes a lot of time. I probably spent 2-3 hours planning and about 5 hours carving. This is my second pumpkin from an image - my first was an anime character, Vampire Princess Miyu (an old webcam photo - sorry!).


If you're interested in carving a pumpkin from a photo you can find lots of detailed instructions online (Google "photo pumpkin carving" or something like that). I did mine a little differently than everyone else. If you're curious, here's what I did:

1. I found a photo online that I liked. The photo needs to be high quality and focus on the face (because everything else will get cropped out). I don't think full body pumpkins would work very well because you just can't get that detailed with a pumpkin. The photo also needs to have good gradational shading - by this I mean that the face shouldn't be all in shadow or all "bleached" out with light.

2. I cropped the photo so that it contained only Jack's face and hair.

3. I divided the photo into three different shades: white, gray, and black. For this step, most of the instructions online have you use a photo editing program to do some fancy stuff so that you end up with three different shades in the photo (black, white, and gray). You do this because it will tell you which part of the pumpkin to carve out completely (white); which part to carve just the skin off (gray); and which part to not carve at all (black). I tried the color tone adjusting method but I wasn't happy with the result. Maybe I wasn't doing it right, but it made way too much black and the photo lost most of it's definition.

So instead I didn't adjust the photo at all - I just printed a full 8 1/2 by 11 print of the cropped photo in grayscale. You may have to adjust the print size of the photo depending on the size of your pumpkin. I then used colored pencils to outline the areas that I thought should be white, gray and black. I used a different color for each shade. This took quite a while and is probably harder than the color/tone adjustment method, but I was happier with the results.

One thing to consider when determining which parts to carve is the structure of the pumpkin - you have to make sure that all the gray and black parts are connected to one another. You can't have a black or gray area floating in the middle of a white area - when you try to carve it, you'll end up with an uncarved piece in the middle of a completely carved area - there won't be anything to keep the uncarved piece there. The only way this can be done is if you wire the uncarved piece in place (which can end up looking funny if you're not careful). It's better to make sure that all uncarved pieces are supported, even if you have to modify the pattern a bit.

4. Next I taped the pattern to the pumpkin and used a poker to poke along the lines I drew with the colored pencils. Be careful not to destroy the pattern durning the poking process, because it will be needed for reference later when carving!

5. After I had poked all the lines (it took a really long time) I went back and "connected the dots" using a permanent marker and keeping an eye on the original pattern as reference.

6. The next step is to cut open the top of the pumpkin and clean out the insides. I don't think I need to explain this part in detail. I spent a lot of time cleaning out the "guts" on my pumpkin because I didn't want them showing through the front.

7. And it's time to carve! I used a pumpkin carving kit from the store to do most of it. They really work much better than regular knives (especially for detailed stuff) because the serrations on the pumpkin blades point away from their handles and so enter the pumpkin more easily.

I started by carving out the largest white areas. The white areas will have all the pumpkin completely removed so all the light can shine through. If you look at the photo you will see that these were the highlights on his cheeks, glare on the forehead and nose, his lower lip, parts of his neck and his hair beads. I then carved out the smaller white areas - the whites of his eyes, the reflection on his pupil, and the stick-thingy sticking out from the hair on the left side of his head (I think it's a shell).

8. After all the white areas were carved, next I carved the gray areas. For the gray areas, only the the skin of the pumpkin is removed - the flesh is left. This lets some but not all light come through and makes these areas darker than the white areas but not as dark as the black areas. For me, removing the skin was the hardest part of carving the pumpkin. I could not get a knife to do the job and ended up using an exacto blade to remove small pieces a bit at a time. There is probably a better way of doing it, but I couldn't think of it!

The gray areas on the pumpkin were his head scarf, highlights on his hair, and the shadows on his cheeks, chin, neck, and nose.

9. Lighting and clean up. At this point, the pumpkin was pretty much carved! To light it, I cut a small hole in the lower back of the pumpkin (large enough to fit an extension cord plug through), saving the cut-out piece. I ran an extension cord through the hole and replaced the cut-out piece of pumpkin, after making a notch in it for the cord. I then plugged an uncovered night-light (4 watts) into the extension cord inside the pumpkin. I wanted a stronger light than a candle so that enough light would go through the "skinned" parts of the pumpkin. I then took the pumpkin into the bathroom and cleaned it up, lighting it up and turning off the lights to make sure that there were no stray pumpkin bits hanging around in the carved areas. And ta-da, finished!
Monday, November 13, 2006

New Blog on MySpace

I've started a new blog about crafting on MySpace which I update regularly:

http://blog.myspace.com/crafty_cattery Update: I no longer have a MySpace blog

Please check it out! All posts in Blogger after today (November 13, 2006) will be duplicates of the MySpace posts.

Monday, March 27, 2006

Dante Basco

This is just weirding me out! I've always enjoyed the movie Hook, which came out in 1991. One of the characters in Hook was Rufio, the leader of the lost boys (Ru-Fi-Ooooo!). He was played by Dante Basco, who was 15 years old at the time. So he was a teenager, old enough to be in high school. This weekend I watched a preview for the new Antonio Banderas movie Take the Lead (a movie about teaching ballroom dancing to delinquents). There I saw Dante Basco, playing a high school student! Fifteen years later! It's been 15 years, Dante's going on 31, and he's still able to play a high school student! And the scary thing is, he actually looks like he could still be a high school student. Strange, huh? Here's his IMDB profile: Dante Basco.

Sunday, January 01, 2006

DMI

Post a comment to discuss DMI 2.0. Be sure to include your DMI username in your comment.

Related Posts with Thumbnails