I just bought a really neat sewing/crafting cart at Walmart! It goes from this:
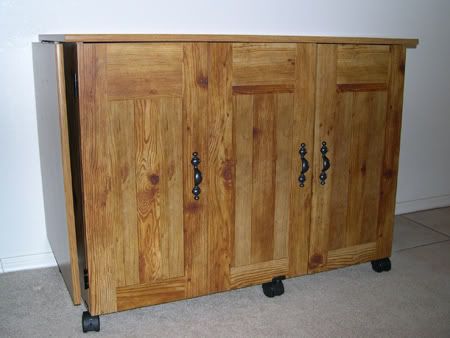
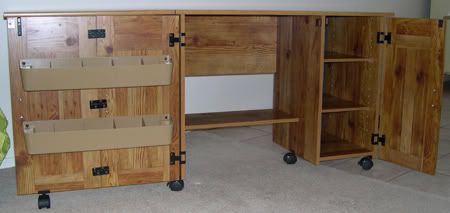
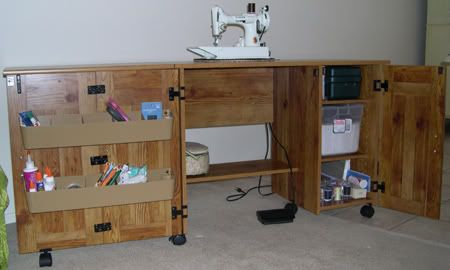
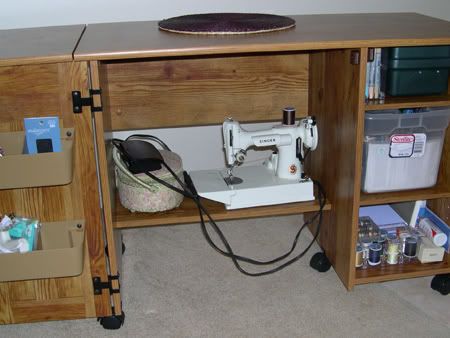
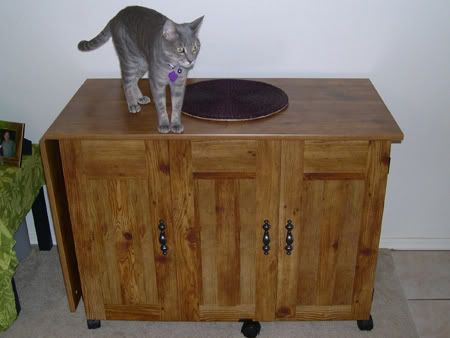
I just bought a really neat sewing/crafting cart at Walmart! It goes from this:


Note: This is the third of three posts about how I made my felt Advent calendar. For information on how I came up with the idea see Part 1; for information on how I made the ornaments see Part 2.
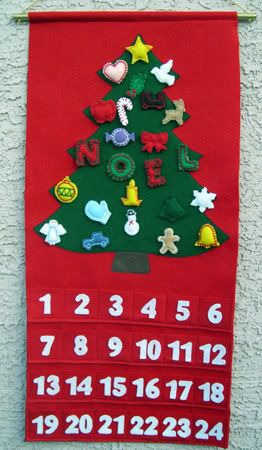
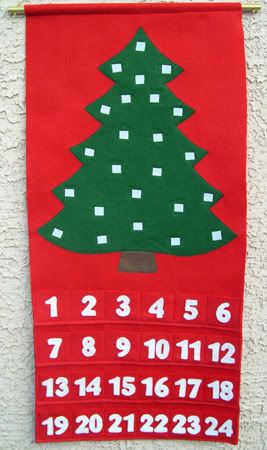
The completed Advent calendar
I've included instructions below if you're interested in making your own calendar. If you have any questions feel free to contact me or leave a comment. And if you make a calendar let me know - I'd love to see photos!
Supplies for the calendar:
- 1 yard red felt
- 1/2 yard green felt
- scrap of brown felt
- sew-on Velcro (the prickly side)
- white, red, green, and brown thread
- white felt pre-cut numbers (Numerals should be about 1 inch wide by 1.5 inches tall. If you're like me and don't have access to pre-cut numbers, you can cut out your own using sheets of white felt and number stencils.)
- felt glue (I used Beacon's Felt Glue)
- 3/8 inch diameter dowel, cut to 18 inches long
- spray paint, gold or other Christmas color
- cord, gold or other Christmas color (will need about 2 feet)
- old newspaper
- transfer webbing (Optional but recommended. This is an adhesive webbing that helps the tree stick to the background. If you can't find this, you can use felt glue.)
Tools for the calendar:
- sewing machine (Recommended, but it could be done without one)
- rulers and/or yardstick
- scissors or rotary cutter
- chalk or other removable fabric pen or pencil (for marking on the felt)
- pins
- drill
In making my calendar I also created my own ornaments that attach to it using Velcro. If you do not want to make your own ornaments you could buy ornaments and attach Velcro to them. You could also buy ornaments with loop hangers on them and hang them from buttons, bells, or beads sewn to the calendar in place of the Velcro.
For help making your own ornaments, please view Advent Calendar Part 2 - Ornament Instructions. For information on my inspiration for this calendar, please see Advent Calendar Part 1 - The Plan.
Instructions for the Advent Calendar:
1. Cut out the body of the calendar. Cut out a piece of red felt that is 34 inches long by 15.5 inches wide. This will be the body/background of the calendar. Be careful that your cuts are straight, as the edges of the calendar will be unfinished. This is where a rotary cutter might come in handy!
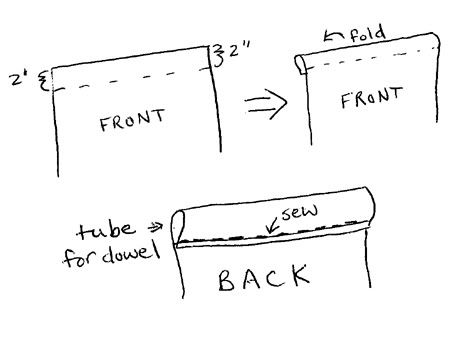
2. Make a tube for the dowel (see diagram). Measure and mark two inches from the top of the calendar. Fold the top backwards to the mark to make the tube. Pin the top in place and then sew the tube closed.
2. Cut out the panels for the pockets. Cut out 4 pieces of red felt that are 15.5 inches long by 2.5 inches wide. These will become the pockets of the calendar.
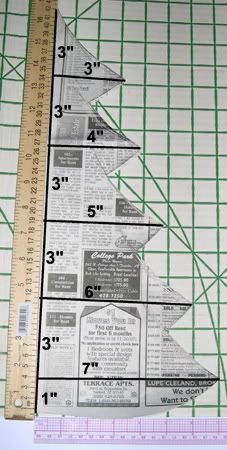
3. Make a pattern for the tree. Take a folded sheet of newspaper and measure 16 inches along the fold, marking each end. From the top, mark every three inches until you have 5 marks. You should still have one inch between your fifth mark and the bottom. Each mark will be one "branch" along the side of the tree. At the first mark, draw a line 3 inches long, perpendicular to the fold. At the next mark draw a line 4 inches long. Continue drawing lines at the marks one inch longer than the last until you have made a 7 inch line at the fifth mark. Now draw in the outline of the half tree. While the newspaper is still folded, cut along your outline. If you're confused, I think the image below pretty much explains this entire step:
4. Open up the tree pattern and pin it to the green felt. Cut out the felt tree.
5. Using the brown felt, cut out a stump for the tree. It should be about 3.5 inches wide by 1.5 inches high.
You should now have the main pieces of your calendar ready:
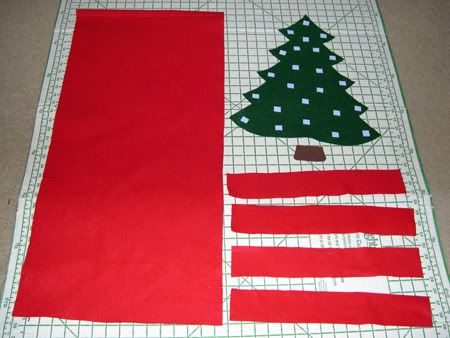
(Don't worry about the Velcro yet - I took this photo after completing step 8.)
6. Make sure everything fits. Arrange the pieces on the body of the calendar to make sure that there is room for all of them. The bottom pocket panel should line up with the lower edge of the body and each subsequent panel should be placed 1/2 inch above the last. The tree and stump should fit between the top pocket and the tube for the dowel. If your tree is too big, you will need to remake it so that it fits. If everything fits, keep the tree piece out and put the rest aside.
7. Cut and position Velcro on tree (If you are going to use buttons/bells/beads instead of Velcro on your tree, you may skip to step 9.) Cut 24 small squares of Velcro. Save the fuzzy sides for the ornaments, and arrange the prickly sides on the tree. Space them as far apart as possible, but leave room for sewing around the edges of the tree. Once you have the Velcro squares where you like them, pick them up and mark their position with a chalk dot.
8. Sew the Velcro on the tree. Using the sewing machine, sew a square of Velcro over each chalk dot. Trim the thread ends neatly.
9. Sew the pockets to the body of the calendar. Line up the first pocket panel with the bottom of the calendar body and pin it in place. Using the sewing machine, start at the top right corner of the piece and sew a 1/4 inch seam down the right side, across the entire bottom, and back up the left side. Leave the top of the pocket open. During this step, the felt in the pocket piece may stretch so that it hangs over the edge of the body. If this happens, just trim the excess.
Starting at the left seam of the pocket panel, measure and mark a vertical line every 2.5 inches. Sew along each line to create six individual pockets.
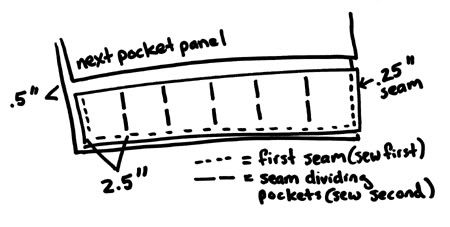
Repeat step 9 for the other three pocket panels. Be sure to place the bottom of the next panel 1/2 inch above the top of the panel underneath it. When marking the individual pockets, check to see that they line up with the pockets underneath them.
10. Use felt glue or transfer webbing to attach the tree to the body of the calendar. I didn't use glue so all I can suggest is to apply it thinly on the back of the tree and position it carefully on the calendar. If you want to use transfer webbing, here are the instructions:
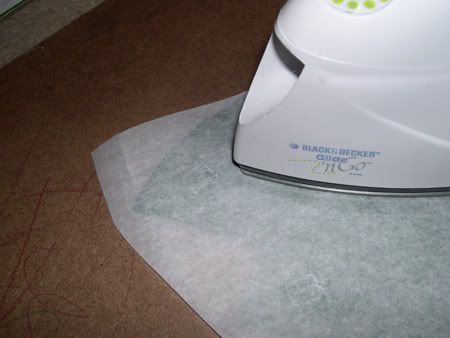
Following the instructions that came with the webbing, use a dry iron to attach the rough side of the webbing to the back side of the tree. Since the Velcro makes the back of the tree uneven, make sure you press into all the crevasses:
Next, trim the paper from the webbing so that it is the same shape as the tree:
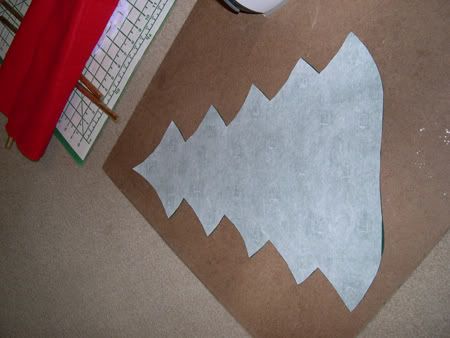
Peel the paper from the webbing:
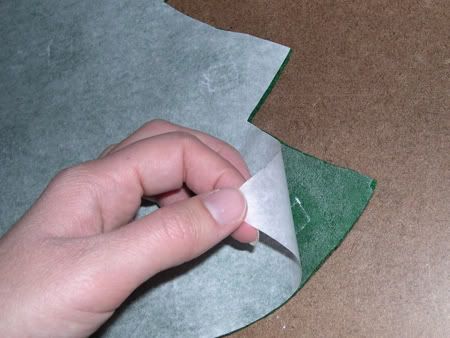
If the webbing does not separate from the paper, go over the area again with the iron.
Position the tree on the calendar body, webbing side down. Make sure it is exactly where you want it. Get a thin clean towel and wet it thoroughly. Wring it well so there is no excess water. Place the towel over the tree and iron slowly:
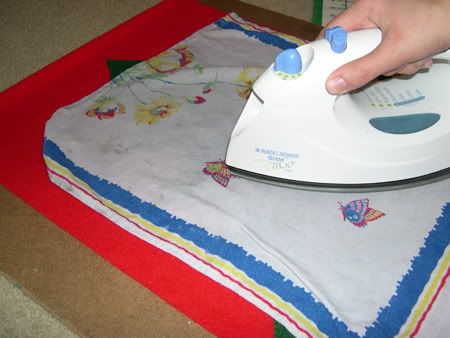
The water from the towel will cause the webbing to stick to the calendar body. Iron through the towel over the entire tree. Re-wet the towel if needed. Check to make sure that all parts of the tree are sticking to the body. If a part is not sticking, go over it again with the towel and iron.
11. Repeat step 10 to attach the stump below the tree.
12. Sew the edges of the tree and stump to the calendar. To reinforce the glue or webbing, use your green and brown thread to sew around the edges of the tree and stump. Sew as close as possible to the edge of the felt. Trim thread ends neatly.
12 1/2. If you decided to use buttons, bells, or beads to hang the ornaments, this would be the time when you could sew 24 of whichever to the tree.
13. Glue numbers to the pockets. If you need to cut out the numbers, use the stencils and white felt to do so. You will need the following amounts of each number:
1 = 13
2 = 8
3 = 3
4 = 3
5, 6, 7, 8, 9, 0 = 2 each
When you are ready to glue your numbers to the calendar, position them all on their appropriate pocket to make sure you have them in the correct place (Once the glue has dried they will be extremely difficult to remove). Use a toothpick to spread a thin coat of the felt glue over the back of each number. Smooth the number into place on the pocket.. Don't press too hard or the glue will smoosh out the sides. Once the numbers have dried carefully re-glue any loose edges.
14. Make the hanging apparatus for the calendar. If you haven't already done so, cut the dowel so it is 18 inches long. Drill a hole through the diameter of the dowel 1/2 an inch from each end (the hole needs to be big enough for your cord to pass through).
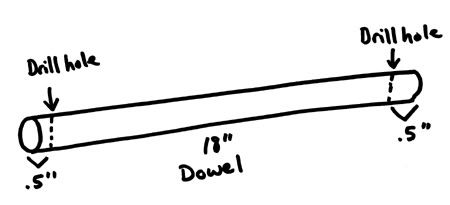
Sand any rough spots from the dowel. Spray paint the dowel. After it dries, put the dowel in the tube on the calendar. Run the cord through the holes and tie a knot in each end.
14. Ta-da, you're finished with the calendar! For help making ornaments, please view my Advent Calendar Part 2 - Ornament Instructions.
Note: This is the second of three posts about how I made my felt Advent calendar. For information on how I came up with the idea see Part 1; for instructions on how to make the calendar itself see Part 3.
I finally finished all 24 ornaments for the Advent calendar!
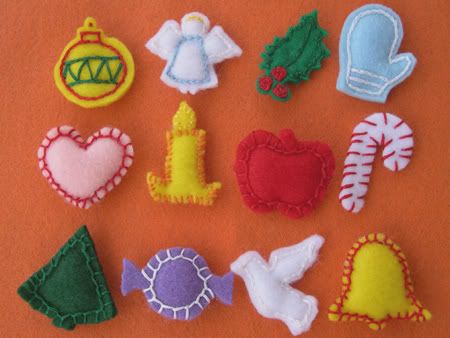
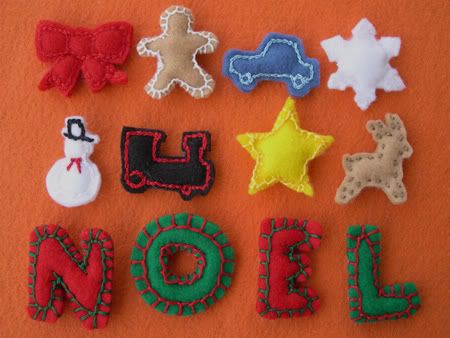
Actually, since I'm making 3 identical calendars it was a total of 72 ornaments!
Supplies for the ornaments:
- sheets of felt (various colors)
- embroidery floss (various colors)
- sew-on Velcro (the fuzzy size)
- batting
- white thread
Tools for the ornaments:
- sewing machine (to attach Velcro to ornament - this could be done by hand)
- large embroidery needle
- scissors
Here's how I made the ornaments:
1. I first came up with a pattern for each ornament. They had to be smaller than 2 inches square so they would fit into the pockets on the calendar. For the easier shapes, such as the heart or the letters, I drew the pattern myself. For the harder shapes, I used Google image search to find a picture of a stencil or cookie cutter in the shape I needed. I downloaded the image and re-sized it so that it was smaller than 2 inches square. I then printed and cut out it out to use as a pattern.
2. I pinned the pattern to two stacked sheets of felt. I then cut out the pattern on both sheets at the same time, creating one front and one back of the ornament.
3. Using my sewing machine, I attached a square of Velcro (the fuzzy side) to the back side of the ornament. I saved the "prickly" side of the Velcro in a ziploc since I would need it later for the tree.
4. Next I used embroidery floss to sew the front and back of the ornament together (right sides out). Before I completely sewed it shut, I stuffed a small amount of batting into it. As you can see from the photos I used several different stitches. Since I don't know much about stitches, I just experimented until I found ones that looked good. The blanket stitch (see "NOEL" letters) worked fine for simple shapes. On more complex shapes I used a running stitch (see the reindeer) or a split stitch (best seen on the car or the mitten).
Next I'll be working on the calendar itself. I'm guessing the hardest part will be making the felt numbers for the 24 days. By my calculations that will be 117 individual numerals to cut out!
Update 11/18/07: I finished the entire calendar! For photos and instructions, please see Advent Calendar Part 3 - Complete Instructions.
My husband and I have been searching for an alternative to pre-packaged Hamburger Helper Cheeseburger Macaroni. In the past we tried making it from a Campbell's soup recipe and it was not a success. I came up with the recipe you see below and we tested it last night. While it wasn't an exact match for the original, it tasted pretty good. Since we used turkey, I added beef bullion to give it a beefy taste. I can't be sure exactly how many cups per serving we ended up with, but it made enough for two large platefuls.
Ingredients:
- 1/2 package Jennie-O extra lean ground turkey (about 10 oz)
- 4 oz Ronzoni Smart Taste macaroni (a high fiber pasta)
- One 10 3/4 oz can of Campbell's Condensed Cheddar Cheese soup
- 1/2 cube Knorr beef bullion
- 1/2 cup boiling water
- 4 oz fat free milk
Prepare salted water for macaroni. While wating for water to come to a rapid boil, brown the ground turkey according to package directions. Drain turkey (if necessary). Dissolve bullion cube in 1/2 cup of boiling water. When salted water is at a rolling boil, put macaroni in and return to boil. Boil macaroni for about 7 minutes or to taste. While macaroni is boiling, add cheese soup, beef broth, and milk to the turkey. Simmer for about 7 minutes (while waiting for macaroni to be done). When macaroni is ready, drain it and add it to turkey mixture. Stir and serve.
Note: Most hamburger helper style recipes have you add the uncooked macaroni to the meat and sauce mixture and simmer it. I've had problems getting the pasta fully cooked this way, so I just made the macaroni separately.
Note: This is the first of three posts about how I made my felt Advent calendar. For information on how I made the ornaments see Part 2; for instructions on how to make the calendar itself see Part 3.
The project I'm currently working on is an Advent calendar (a calendar that counts down the days until Christmas). I'm using my family's Advent calendar as a guide - it was made for us by my paternal grandmother many years ago.
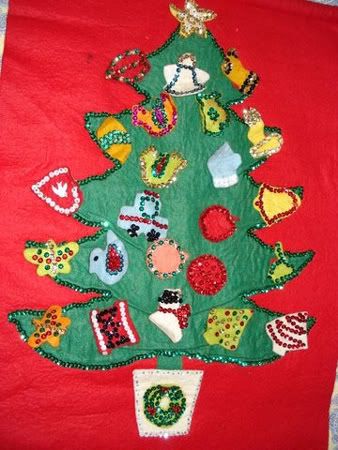
The original Advent calendar (showing the ornaments)
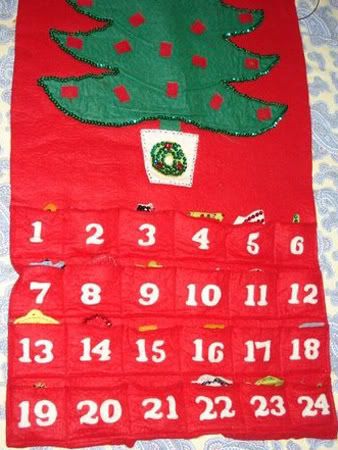
The original Advent calendar (showing the pockets)
Unfortunately, due to the lack of crafting resources in my area, I'm having to deviate from the original quite a bit. The only sequins I could find in town were white and purple, so I'm having to go without. I was also unable to find red felt by the yard so I'm going to have a white felt background instead. Since the ornaments were my biggest problem I've started on them first. Here are a few of the better ones:
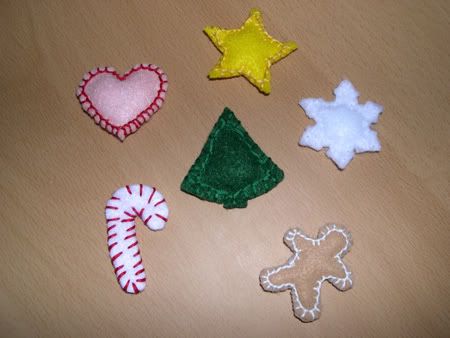
Hopefully they're all recognizable! If not, here they are clockwise from the bottom right: gingerbread man, candy cane, heart, star, snowflake and Christmas tree (in the center). They are made of two pieces of felt, stuffed with batting and with Velcro on the back. I used embroidery floss to sew the pieces together.
The sewing is pretty easy. The hard part is coming up with 24 different recognizable ornaments. Since I'm no good at embroidering details on them (I've tried, but it looks awful!), they have to be identifiable by their shape alone. I'm using the ornaments on the original Advent calendar as inspiration, but some of them would lose their meaning without the details sew on.
So far the other ornaments I have planned are: bell, candle, apple, piece of candy, car, train, ornament (you know, the old fashioned glass ones that are shaped like a turnip), and the letters in NOEL. That brings me to 17, so if anyone has suggestions for other ornaments, I'd love to hear them!
Update 11/15/07: I've finished all the ornaments! For photos and instructions, please see Advent Calendar Part 2 - Ornament Instructions.
Update 11/18/07: I've completed the entire calendar! For photos and instructions, please see Advent Calendar Part 3 - Complete Instructions.
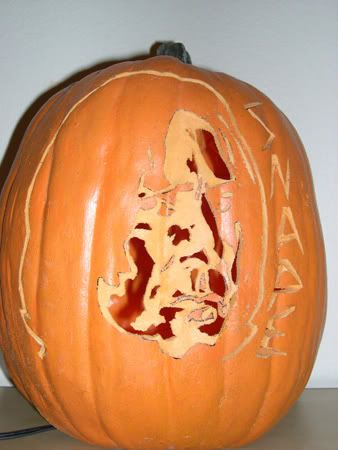
In honor of the release of the final Harry Potter book this year I decided to carve Professor Severus Snape (as portrayed by Alan Rickman).








Kevin and I hosted a Halloween party this year, which gave me an excuse to wear a costume! I went as Captain Jack Aubrey (Russell Crowe in the movie Master and Commander: The Far Side of the World). Kevin went as Dr. Gregory House from House MD.


Notice: My patterns are free and may not be sold. Please do not reproduce or repost patterns or instructions from CraftyCattery.com without my permission. For information on selling items created from my patterns, please view the FAQ.