This is a follow-up to my post of 2/18/11. Here's the film again in case you missed it (FYI it's 12 minutes long):
This project has been in the works for years. In 2007 I joined NBC's fansite for The Office, Dunder Mifflin Infinity (it's now called Dunder Mifflin Sabre). I met a bunch of cool people who loved the show as much as I did and we had fun geeking out and playing games on DMI.
In the spring of 2008 I created this puppet video for a contest on DMI. It made it in to the top 5 entries but didn't win. However, I had so much fun making it that I started to look for something else to film. I worked with a friend from DMI and we came up with a story idea then wrote a script. But it seemed too complicated for puppets so we ended up sitting on it for a few years.
In 2009 I ran across an animation program called Anime Studio Debut 6. It was cheap so I bought it and played around with it for a while. Once I had a general idea of how it worked, I picked our script up again and decided that it would be possible to use Anime Studio Debut to film it. Here's what I did.
Actors and Lines
The different expressions I asked my actors to photograph.
The actors in this film are my friends from The Office fansite and are located all across the country (one is even in the UK!). So everything we did had to be done over the internet.
The first step was to get photos of my actors' faces. I went through the script and figured out all the expressions that the characters would need to make during the film. I then asked my actors to take photos of their heads making each of the expressions as well as a photo of the back of their head for when the character was facing away from the camera. Even if I wasn't sure if a character needed that expression, I had them do it anyway. This was a good idea since I ended up needing some of those expressions later.
At the same time, I sent each person a numbered list of lines for them to record. They recorded the lines and emailed them to me. This was actually one of the biggest headaches for me because there were so many different file types and often my computer didn't want to read them. However, my dad recommended GoldWave, a downloadable audio editing program (it's free to try, $49 to buy). Not only did it read all the file types and convert them into .wav files for me, it also allowed me to increase the volume in the clips and clean up a lot of the background noise.
Creating the Bobbleheads
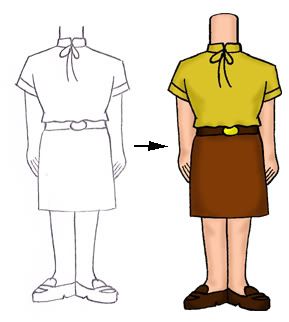
Before and after: pencil sketch to shaded color body.
I had the lines and the actor's photos so now it was time for me to make the bobblehead characters. I drew by hand a body for each character then scanned my drawing into Photoshop where I cleaned it up and colored it. I purchased a cheap USB tablet that was a huge help when it came to working in Photoshop. It made drawing, coloring, and cropping much easier.
Next I cropped out each head and put them in the same Photoshop file as the body, resizing them to fit on the body. I had a layer for each head and one for the body.
Now I needed a way for the mouths to move when the characters talked. In Photoshop I cut out the lower lip and jaw of each face that needed to talk then made additional layers and moved the mouths in to five different positions, from closed to open wide.
I saved each mouth, face, and body layer individually as a .png file then imported all the layers for a character into an Anime Studio Debut file. I rigged the figure and saved it so that I could import it in to any other Anime Studio Debut file and it would be ready to "act"!
Backgrounds
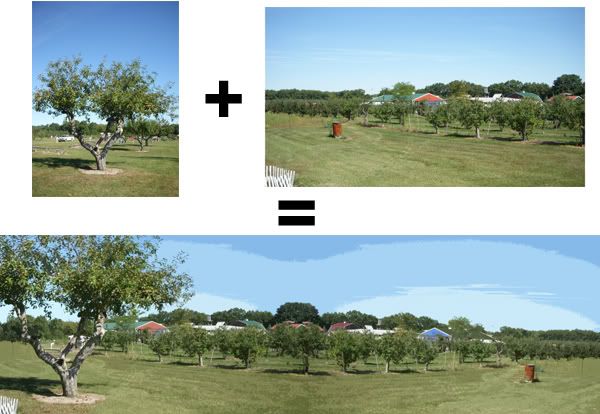
I combined two photos I took at Wiard's Apple Orchard to create one long background for a scene.
Most of the backgrounds are photos. I put them all through Photoshop's "Cut Out" filter so that they would look more cartoonish as well as to compensate for the fact that some photos weren't the same quality as others. If there was a piece of furniture or other object that a character would need to stand behind, I duplicated the background in to a new layer then cut out the object. In animating the character layer would be between the furniture layer and the background layer and thus would appear to be standing behind the furniture.
Props
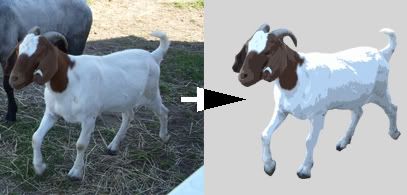
Goat photo (actually from the petting zoo at Wiard's Orchard, not Domino's Petting Farm), before and after Photoshopping.
Props were pretty easy, I just took a photo then I cut the object (such as a phone) out of the photo then put it through Photoshop's "Cut Out" filter. The hardest props weren't really props at all but characters - the animals at the petting zoo. It was not easy to get that goat to move!
Animating
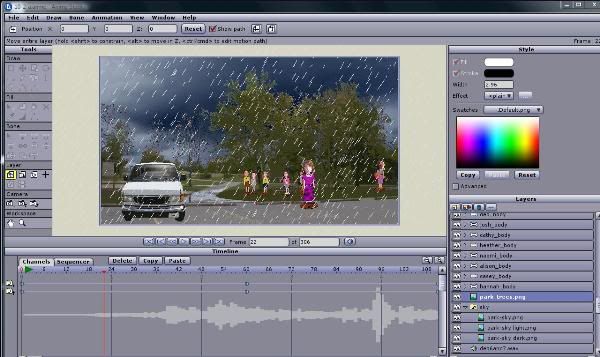
Animating in Anime Studio Debut
Once I had the bobbleheads, backgrounds and props I could finally start animating. Though I had done a few test animations before starting, I went into this with almost no idea how to use Anime Studio Debut. Consequently there was a lot of frustration and more than a few tears before I was done. That's probably one explanation for why it took me ten months to animate this thing!
I wish I had the time to explain how to use Anime Studio Debut but it is so complicated that I don't think there is any way I could do it. I learned by fiddling around with it, using the tutorials provided with the software and going to the Anime Studio forum when there was a question I couldn't answer elsewhere.
While I can't go through everything, I will mention a few things I did to make the animating easier:
- Instruction Sheet. I made an instruction sheet for myself. If I figured out how to do something complicated I wrote it down so I wouldn't have to figure it out again the next time.
- Scene Chart. I created a spreadsheet with each scene listed. I broke down the scenes by shots (parts of the scene that require a different angle or background) then gave each shot a number (1-1 would be scene 1, shot 1). Next to the shot I copied from the script the description of the action and any lines spoken in that shot. I then named my animation files with those numbers so I could keep track of what I was animating.
- Keep Clips Short. Anime Studio Debut can slow down if a scene has a lot of layers and action so I tried to keep each clip to about twelve seconds. If the clip went longer, I often would break it up into two different clips.
- Use Sync Switch Layers Feature. The ability to sync switch layers to an audio file in Anime Studio Debut is awesome! I used it to make the characters talk. All I had to do was import the audio file then sync the mouth switch layer to it and the program would automatically make the mouths flap according to the loudness of the audio. It's not perfect, though, so I always had to go back and clean it up a bit.
- Mix Audio with Goldwave. Anime Studio Debut only allows you to have two audio files in the program at once. This wouldn't work for scenes where I had several people talking at once. I solved this by first pasting together the different audio clips in GoldWave then importing one big audio clip into Anime Studio Debut. I synced all the characters' mouths to that one file then went in and cleaned it up so that the characters only talked during their lines.
- Watch Out for Popping Audio. Be aware that if you have two audio files in Anime Studio Debut and they are producing sound at the same time, you may end up getting a popping sound. For example, in the raining picnic scene I originally had one audio file for the thunder and another for speaking, but I found that whenever there was thunder at the same time as someone was speaking I would get the popping sound. I solved this by removing the thunder audio file and adding it back in when the animating was done using Windows Movie Maker.
- Watch Out for Spatial Positioning. Another sound quirk that Anime Studio Debut has is called spatial positioning. It is turned on automatically for every audio file and changes the loudness of the file and which speaker the sound comes out of depending on where your "camera" is relative to the position of the audio clip. I didn't notice that this was a problem until one day when I was animating using my headphones and realized that sometimes the sound would come out one earbud but not the other. At first I thought something was wrong with my headphones, then with my sound card, then with my audio file...it took me forever to realize that it was all due to an annoying check box hidden in the audio file properties in Anime Studio Debut!
- Making it Rain. This wasn't easy. In the more expensive version of the software (just called Anime Studio, without the "Debut") there is something called Particle Effects which apparently make it much easier to animate things like rain. But I had the cheap version, of course, and Particle Effects doesn't come with it. What I did was draw some diagonal lines in a layer, then replicated them over and over using the Scatter Brush tool. I then animated the layer to move from top to bottom across the screen and when it reached the bottom, to jump back to the top and cycle back to the bottom again. I duplicated that layer and animation a couple times and moved their timing around so that there would always be rain on the screen.
Putting It All Together
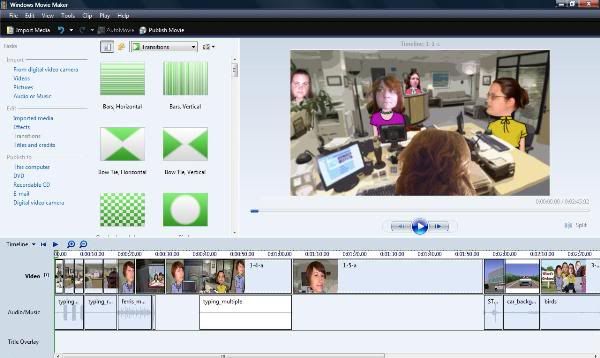
Editing in Windows Movie Maker
By the time I was done animating, I had about 60 video clips of various lengths that needed to be edited together. To do this I used Windows Movie Maker which came free with my computer.
I got some flack from my husband for using Movie Maker. Apparently a lot of people find it lame, fit only for putting together vacation slideshows. But I liked that it was simple and would easily produce a file in the 16:9 widescreen dimensions that I needed for Youtube. I did take a look at another program, Adobe Premiere Elements, and while it had some neat stuff and would let me mix more than one audio track at a time, it was also extremely limited in the choices it gave me for what file types and sizes it would produce. It didn't have an option in the dimensions I needed so I chose not to use it.
Like Anime Studio Debut, Windows Movie Maker gets very slow and unwieldy with larger files so I first broke up my movie into four parts. I edited each part together, removing any extra footage, adding in scene transitions and extra audio files like the thunder. Next I published and saved each of the four parts in the highest quality format I could. Finally I put the four parts along with opening and closing credits in a new file and published the final file. I was done!
*
I hope this helps explain how I created this film. Though it was a lot of hard work I also had a lot of fun and enjoyed pushing myself to learn something new.
As I said, I'm no expert when it comes to animating but if anyone has a specific question about how I did something in the film, I'll do my best to answer it. Thanks for reading!


